Monday, January 25, 2010

The fabric that just won't go away...

On one of the quilting sites I frequent there has been much talk about the infamous puffer fish fabric. So being the inquisitive guy I am, I asked questions, made inquiries and even found some puffer fish!!!! It's a good thing it was sent in a brown envelope as I think it woulda given the postman a scare, heart attack, and early retirement... So without further ado.....I give you the FUGLY Puffer Fish.


Notice the human like eye and mouth!!! It's enough to scare the crap outta your neighbor.

Stay tuned for a project using this fabric!!!!

Friday, January 22, 2010

When life gives you lemons...


Find someone who's got some vodka.. Oh wait.... Make Lemonade!!!


A few days ago, Stephanie at A Ditchin' Time Quilts nominated me for the Lemonade Award. Thanks Stephanie!

The award is given out for bloggers that show great attitude and gratitude.

These are the rules of accepting the award.
1. Put the Lemonade logo on your blog or within your post. DONE (see logo above)
2. Nominate at least 10 blogs with great attitude or gratitude. DONE (see list below)
3. Link the nominees within your post. DONE (go check 'em out!)
4. Let the nominees know they have received this award by commenting on their blog. DONE
5. Share the love and link to the person from whom you received this award. DONE (click link above)


My nominees are (in no particular order):

Melissa at Ardea's Nest

Carin at Conceived Without Regard For Reason or Reality
Charlie at It's Just Me
Trudi at Quilting Prolifically
Terry at Terry's Treasures

we're half way done!!!

Rosa at Rosa's World
Christina at icandy
Chris at Mad Creek Designs
Brooke at Disconnected Stitches
Raymond at Nacho Grandmas Quilts

Sunday, January 17, 2010

PROJECT: PPW. DAY 9

Today got off to a late start. Bed time came at about 5:15 AM. I had been up for ALMOST 23 hours. Late this afternoon, I attempted to cut my templates out of a piece of Plexiglas. Things did NOT go well. I used a jigsaw with a metal cutting blade (finer teeth than a wood blade). I got a few pieces to come out in 1 piece but the edges were not smooth, a little sanding should have fixed it, but no, sanding just melted the Plexi. Another thing I found is that if I used a slow speed the plexi melted and if I went fast the plexi cracked. There was NO happy medium. I now have a floor full of cracked plexi and melted plexi chips!! Got any salsa?

Back to the drawing board on that. May find some sheet acrylic (thicker than the Plexi)and try again with a fine-tooth band saw.

I then decided if I print my foundations on my printer by ironing freezer paper to the back side that would be quicker than creating the foundations by hand. STRIKE TWO!!! I still have muslin and freezer paper stuck in my printer.

Argh! I think I need to go sew for a while... That'll make me feel better..

Until next time.

Questions and comments welcome.

Friday, January 15, 2010

PROJECT PPW: Chapter 8.

Hey you... Stop copying me! Tonights chapter involves mirror image blocks.


These two blocks are mirror images. They're created by cutting 2 shapes out of the fabric, one right side up and the other upside down( folding the fabric and cutting two shapes at once speeds this along!). There are numerous designs to be made with the mirror image blocks. Here are a few, you can still create stars and "eyes"


I have not incorporated these into the other blocks I've made, but will probably do that this weekend. Look for a few extra posts on this. I'll also be cutting new templates out of a sheet of acrylic

Thanks for reading. Comments and questions always welcome.

Thursday, January 14, 2010

Project: PPW. Day 7

To catch up any late readers....

I'm 7 days into my first ever foundation piecing quilt. I'm using a system invented, designed, thought up, and refined by Raymond K. Houston. If you'd like to read what has gone on so far, there are links on the right side from start to current post.


Tonight I completed 3 more "tiles". I even made a small 'design wall' so I could see the blocks as I finished them. I currently have 8 blocks done and the designs I'm coming up with are varied.


Heres a 4 patch using 2 tiles of each color combination


Heres all 8 blocks, notice the squares that emerge between the dark stars.

Notice how each block has a matching color touching. This in itself could lead to a different star pattern, or depending on the rotation of the block a totally different design.

When I get more blocks completed the design will no doubt get more complex. And much more AWESOME!

Tuesday, January 12, 2010

Project: PPW Day 6

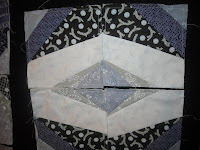
So tonight I made more foundation pieces and cut more fabric and even created this block.


I'm finding on some pieces that even with a 1/4 inch seem allowance on all sides of the pieces, I'm almost coming up short when I sew down the edges . For example, the dark purple in the upper left corner, just caught the needle as it was sewn down. I'm thinking of increasing my seem allowance to 3/8ths of an inch just to be on the safe side.

After finishing this block I paired it with one of the others I've made. No matter which way the blocks were turned at least 1 color on each block matched up. I'm itching to get more blocks done with different colors to see what I can create.

I've also realized I have to have an appliquéd quilt done by March. I may be doing double duty and working on both projects. Who knows....

As always questions and comments are welcome.

Monday, January 11, 2010

Chapter 5.... Cutting Day.

So actually it was cut and sew day. Having the day off really helped in getting the fabric cut. Although I still have more fabric to cut, I did manage to get 4 blocks together. I just couldn't cut 'em out and not get a few together could I?


I cut strips off of my FQ's measuring 3 1/8 x 18 inches (2 of each strip). Again, I'm using Twilight Frost from Connecting Threads.


I then cut around the template adding 1/4 inch to each side for seem allowance (Shameless plug for Aunt Sadie's Quilt Shop.Located at 208 Winchester St. Winchester Ks.)


Following Raymond's directions for foundation piecing I attached my pieces to the muslin. After attaching all the pieces tothe muslin I got this..


I rinsed and repeated 3 more times (total of 4 so far). With 4 "blocks" I can make any number of designs...


This is just one of the designs I came up with. To create a different design all I have to do is rotate any one (or all) of the blocks for a different look.

If you're just joining me on my journey, please be sure to read my other posts. Links to them are located on the top right side of this blog. Comments are questions are always welcome.

Sunday, January 10, 2010

Thoughts and Questions

Have you ever been woken by the telephone ringing? I was today, at the crack of 1:00pm. After the short conversation with my mother I went back to bed. Granted we went to sleep at 7:00am this morning, but thats a diferent blog post for a different time. As I'm trying to get back to sleep, questions like, "What if I were to sub-divide the colors into light, lighter, dark and darker." That would give this quilt a more dynamic look. But then I thought about using more tiles, I can use 4 tiles and make a 4 patch block, but what if I used 9 tiles and made a 9 patch, or made a 16 patch? With each tile's ability to be presented in 4 ways the combinations are endless (almost).


Stay tuned, tomorow is my planned 'cutting day'!!

The key to a great quilt....

Is a good foundation. So tonight I'm starting to cut more muslin foundations.


I started with about 2 yards of muslin and my NEW rotary cutter (Thanks Grandma!!!).
After a few folds (yes I cut 4 at a time), and a few cuts later...

20 more foundations to starch & draw the stencil on.

For my starch I'm using Sta-Flo starch diluted with water at a 5 oz of water to 1 oz or starch ratio. Instead of soaking them as Raymond does, I'm using a spray bottle set to mist and giving the foundations a nice shower and allowing them to dry. Kind of a trial and error thing, if that doesn't work I'll soak them.

So while I'm cutting foundations, my wife says to me "I'm excited to see how this turns out." All I could do was smile. Thanks dear, that means a lot to me.

In a few emails to Raymond today, he's offered more insight and suggestions. Thanks! Without you, I wouldn't be doing this. I've also promised that if I find out something really neat or an easier way to do something, I'd pass it along to him, and don't worry, I'll post it here as well.

Saturday, January 9, 2010

Houston!!! We had a problem

But I think it's fixed now. I hope.
I had to make some of my own foundations, no big deal right? So I thought. I traced the template onto the muslin with ease. (see picture below)

When I got 5 of these done, SOMETHING didn't look right. I rotated, flipped upside down, and even redrew my lines TWICE! Then it hit me. After re-reading Raymond's blog post on foundation piecing, I needed 9 inch squares not the 6 inch that I cut.

Now I'm working with pieces like this...


This size SHOULD help in constructing the blocks. I hope to start that Monday. As for now, I have enough muslin that this little "learning experiment" won't affect my supply! I just hope my pen holds out.

FYI the pen I use is a Bic Mark It ultra fine point permanent marker.

Friday, January 8, 2010

And so the journey begins.

I've spent part of last year getting to know Raymond. He's the brain behind Nacho Grandmas Quilts. I've soaked up EVERY tidbit of information that has come from his website, blog, email, phone call and book. Yes, he's even self-published his own book!! He was kind enough to send me a copy (autographed even!) along with his template and foundations. So anywho, here begins my journey creating my first quilt using Raymond's system. Sit back, grab a drink, and enjoy the journey with me.

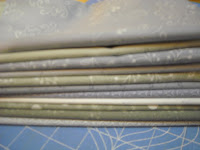
I'm going to use Twilight Frost from Connecting Threads for my fabric. I have 21 fat quarters divided into lights and darks. I'll supplement fabric as needed with the charm packs and jelly roll.

the lights..............................and the darks

I have my template as well..

I started with this.................and now have this (sorry about the bad pic.)

Thus begins my journey down a new path in my quilting (mis)adventures. Thanks for joining me and as always comments are welcome.

Monday, January 4, 2010

My last project of 2009

I finished this before the year ended. I received this as a kit from Carin of Conceived Without Regard for Reason or Reality fame. Go ahead, click the link, you'll see my name twice!!!!

I made a few modifications but I think it turned out nicely.


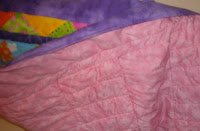
The front, in all it's purple glory.


The back, yes thats PINK! It's from the Moda marbles line.

Friday, January 1, 2010

These are a few of my favorite things.....

2009 Is gone... I've spent the greater part of the year quilting, completing 15+ projects. Listed below are my top ten items I found made it easier to finish my projects.

Heres my top 10..

10. My notions... Including my cutter, seem ripper (ergonomic even!) quilting pins, and thread scissors.

9. Essential thread from Connecting Threads they have a ton of colors and it comes on a 1200 yard spool for less than $2.

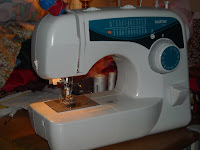
8. My sewing machine. I spent 4 weeks trying to get the accessories the website SAID came with it. Since my machine arrived, it's completed most of my projects. No more sharing a machine with my wife.

7. Freebies!! I won these from a couple of blog give aways... I'll know what day it is thanks to Ryan at I'm just a Guy Who Quilts and the book came as a multi-part win from Carin at Conceived Without Regard for Reason or Reality . I also won a kit from Carin, pics to be posted soon.

6. Quilters Cache.com Tons and Tons of FREE patterns...

5. The QuiltGuy Yahoo! Group. Lots of talented guys who quilt.

4. Aunt Sadie's Quilt Shop. In a very small town. Open 3 days a week. Unbeatable customer service. Worth the trip if you're in the area.

3. Raymond K. Houston. Owner, operator, and mad genius behind Nacho Grandmas Quilts. Both the BLOG and WEBSITE. Raymond does amazing work.

2. Charlie Scott owner of the It's Just Me blog. He also does amazing work. He keeps creating quilts even though two of his quilts have been quiltnapped by his long arm quilter. Shame on you Amber!!!!

and my number 1...

My wife and quilting partner, Brooke, the driving force behind the Disconnected Stitches blog. It's great that I can bounce ideas and color choices off of her and she'll give me her honest opinion.


So, thats my top 10. I read over 100 quilting related blogs and all of them are great reads. If I had the time to list them all I would.